FL Studio: Making a Beat
Making a rythmic beat and a fill and what a "fill" actually is.
Making a rythmic beat and a fill and what a "fill" actually is.
Author: Überschall
So after I've finished the Basics tutorial featuring the creation of our song's stringpatch, we need a nice beat.
The beat leads the song, it defines it's pace and can be really tricky, especially if you're new to FL Studio's technical possibilities.
So after I've finished the Basics tutorial featuring the creation of our song's stringpatch, we need a nice beat.
The beat leads the song, it defines it's pace and can be really tricky, especially if you're new to FL Studio's technical possibilities.
The Beat
We're producing this beat in the SQR. It's basicly the same thing as the Piano Roll, just without the vertical dimension so it only defines when a sound is played, but that's all you need for a beat.
FL Studio operates in Patterns. You'll learn more about those in my next tutorial about the Playlist, for now, you need to know how to switch patterns.
Right next to the BPM , there's that thing with a "1" inside, having "PAT" under it. Click on that and pull the mouse up slowly, until the number's "2". Now you're in pattern 2 and your string arrangement in the PR is gone. If you switch back to pattern 1, it's there again.
So in Pattern 2, we'll make out beat.
As for the samples we'll use, pick the "HipHop" folder in the "Packs" folder in the Browser, for the song I wanna make, it's the best bet.

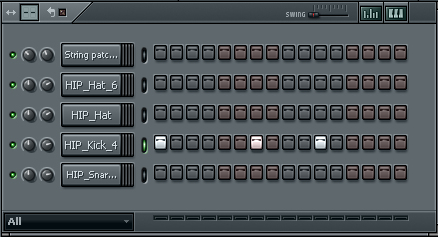
Drag the following samples into the SQR. Do not drag them onto the Strings but under them, into the nothing right under the strings. If you drag it onto the strings, they'll be replaced with it, but you do not want that:
When you've got that, it should look like this:

First thing we'll place will be the kick. There are a lot of basic kick arrangements, place the kicks like this:
Next to come, the snares. Normally, let's say 90% of the time, you place your snares every eight steps, like this:

This is how snares always go, unless you have a broken beat that goes different, but for starting out, that's too hard to handle, so choose this way.
Now we need some Hatz. Right-click the "HIP_Hat_6" and choose "Fill each 2 steps". The outcome is this:

Press [Spacebar]. That's a beat. Simple, but it's a beat. Let's fill it in some more.
Go to "RealDrumkits" in the Browser and pick "RD_Shaker", drag'n'drop it in.
Place it every step and click that little symbol on top of the SQR, on the right side, so you get that graph with the pink bars. If you click into one, it will go down or up to where you clicked. Make them go this way:

The higher the bar is, the louder the step is played, so now you've got some nice shaker in this. Whatch that I also placed the HIP_Hat irregulary to fill stuff a bit.
Now I think this could need some mastering. You can alter the volume of a channel by clicking the little wheel on the left side that's right next to the channel's name and altering it like the other knobs, like this:

Play with that on every channel to make it sound smooth.
Making the fill, cloning a pattern
Now we also want to make a fill, but we need to make that on a different pattern, so this one stays as it is.
To do this, we need to get into the playlist. To do that, press [F5]. You'll now see this:

Now, press [F2] to give the pattern with the Beat a name. We'll just call it "Beat":

Now, right-click that pattern and go like this:

Select the cloned channel and close the Playlist. You see the beat as it's in the second pattern, just the same. That's the way it's supposed to be.
Now we can do the fill. Place the fills and the graph bars like this:

That already sounds like a fill. But to make it sound a bit more realistic, right-click the snare and goto the PR.
There, you place some steps like this:

Make sure that everything remains at C5! Those spikes on the bottom are the same as the pink bars in the graph, alter them accordingly.
Close the PR Again. What I like to put into a fill is a crash, or the sound of hitting a ride cymbale hard. You find some of those in the FPC samples from FL Studio, pick that one:

And place it like this:

Now you've got a beat and a fill, great job!
This is it for this tutorial, I will go on with some other tutorials next time, showing you especially how to use the Playlist.
Newsticker
+-+-+-+-+-+-+-+-+-+-+-+-+-+-+-+-+-+-+-+-+-+-+-+-+-+
e Playlist, an essential -- Melodies -- Structuring your Song -- Th+-+-+-+-+-+-+-+-+-+-+-+-+-+-+-+-+-+-+-+-+-+-+-+-+-+
We're producing this beat in the SQR. It's basicly the same thing as the Piano Roll, just without the vertical dimension so it only defines when a sound is played, but that's all you need for a beat.
FL Studio operates in Patterns. You'll learn more about those in my next tutorial about the Playlist, for now, you need to know how to switch patterns.
Right next to the BPM , there's that thing with a "1" inside, having "PAT" under it. Click on that and pull the mouse up slowly, until the number's "2". Now you're in pattern 2 and your string arrangement in the PR is gone. If you switch back to pattern 1, it's there again.
So in Pattern 2, we'll make out beat.
As for the samples we'll use, pick the "HipHop" folder in the "Packs" folder in the Browser, for the song I wanna make, it's the best bet.
Drag the following samples into the SQR. Do not drag them onto the Strings but under them, into the nothing right under the strings. If you drag it onto the strings, they'll be replaced with it, but you do not want that:
- HIP_Hat_6
- HIP_Hat
- HIP_Kick_4
- HIP_Snare_2
When you've got that, it should look like this:
First thing we'll place will be the kick. There are a lot of basic kick arrangements, place the kicks like this:
Next to come, the snares. Normally, let's say 90% of the time, you place your snares every eight steps, like this:
This is how snares always go, unless you have a broken beat that goes different, but for starting out, that's too hard to handle, so choose this way.
Now we need some Hatz. Right-click the "HIP_Hat_6" and choose "Fill each 2 steps". The outcome is this:
Press [Spacebar]. That's a beat. Simple, but it's a beat. Let's fill it in some more.
Go to "RealDrumkits" in the Browser and pick "RD_Shaker", drag'n'drop it in.
Place it every step and click that little symbol on top of the SQR, on the right side, so you get that graph with the pink bars. If you click into one, it will go down or up to where you clicked. Make them go this way:
The higher the bar is, the louder the step is played, so now you've got some nice shaker in this. Whatch that I also placed the HIP_Hat irregulary to fill stuff a bit.
Now I think this could need some mastering. You can alter the volume of a channel by clicking the little wheel on the left side that's right next to the channel's name and altering it like the other knobs, like this:
Play with that on every channel to make it sound smooth.
Making the fill, cloning a pattern
Now we also want to make a fill, but we need to make that on a different pattern, so this one stays as it is.
To do this, we need to get into the playlist. To do that, press [F5]. You'll now see this:
Now, press [F2] to give the pattern with the Beat a name. We'll just call it "Beat":
Now, right-click that pattern and go like this:
Select the cloned channel and close the Playlist. You see the beat as it's in the second pattern, just the same. That's the way it's supposed to be.
Now we can do the fill. Place the fills and the graph bars like this:
That already sounds like a fill. But to make it sound a bit more realistic, right-click the snare and goto the PR.
There, you place some steps like this:
Make sure that everything remains at C5! Those spikes on the bottom are the same as the pink bars in the graph, alter them accordingly.
Close the PR Again. What I like to put into a fill is a crash, or the sound of hitting a ride cymbale hard. You find some of those in the FPC samples from FL Studio, pick that one:
And place it like this:
Now you've got a beat and a fill, great job!
This is it for this tutorial, I will go on with some other tutorials next time, showing you especially how to use the Playlist.
Newsticker
+-+-+-+-+-+-+-+-+-+-+-+-+-+-+-+-+-+-+-+-+-+-+-+-+-+
e Playlist, an essential -- Melodies -- Structuring your Song -- Th+-+-+-+-+-+-+-+-+-+-+-+-+-+-+-+-+-+-+-+-+-+-+-+-+-+