I hear this all the time. And instead of kicking people in the face and throwing them in the gutter for trying to talk to me, I thought I'd change my ways and write this little helpy page. Note: this is for people who have ABSOLUTELY no clue about making maps for HL or HL mods. So, if that is you, and you need to be told what to do, read on, little doggy!
Warning: You must own Half-Life and/or Counter-Strike.
Step 1 - Get the Dope
You can't make something out of nothing, so grab yourself a shiny new copy of the "Valve Hammer Editor" and also get the "ZHLT Compilers". These are absolutely required to make maps for HL games.
Direct link to Hammer Editor (v3.4)
Direct link to ZHLT Compilers (v2.53r17)
The Valve Hammer Editor, henceforth referred to as "Teh Hammre" is what you will use to physically build your map. With it you decide the placement of walls, textures, player starts etc.. ZHLT converts, or compiles your map so that Half-Life can load and play it.
Install Teh Hammre and start the program. Click NO when it asks you something upon starting up. You should look at the help guide later but for now it has too much information all at once. Then you should see something similar to this:

It's time to configure!
Step 2 - Plug It In
Many new users of Teh Hammre are so scared by the configuring process that they run away, never to come back. There's a TON of stuff to set up! The trick is that you can ignore most of it, so here's all you need to do:
The list is indented corresponding to tabs and pop-up windows (called dialogs).
Click the Game Configurations tab
Click the Edit button
Click the Add button in the dialog that pops up[/B]
Type "cstrike" in the textbox
Click the OK button
Click Close
Now click the Add button on the big Configure window[/B]
Find the file called "halflife-cs.fgd" Help!
Some new text should appear in the text fields[/B]
Click the Textures tab
Click the Add WAD button (a WAD file is a texture collection. You will use them to make the walls and floors different textures so it's not all plain.
Find the file called "cstrike.wad" Help!
All done -- click OK to close the big Configure window
You can get back to the Configure window by selecting Tools->Options from the menu bar. You should go there and look around once you are familiar with map design.
If you completed everything, you're now ready to start building!
Step 3 - Buildin' Blocks
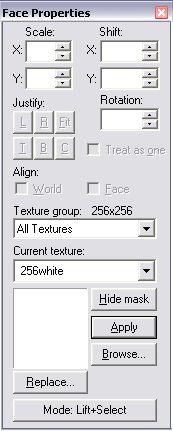
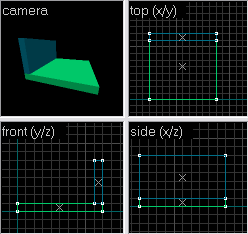
You should have Teh Hammre open, so now select File->New from the menu bar. You should now see 4 big black rectangles, or viewports, labelled camera, top, front and side. To the right, you should see a panel that looks like this:
That panel shows what texture is currently selected. A texture is a picture that is plastered onto a wall, floor, ceiling, or surface in a 3d game. You've probably seen them before. You can choose a new texture by clicking the Browse button. It will display a list of all the textures you have loaded right now. (Remember opening the file 'cstrike.wad'? That's where these textures came from.)
Once you have selected a texture that makes your heart filled with gladness, click the button on the left that looks like this:

This is the brush creation tool. A brush is a 3d chunk of space defined by a few surfaces. For example, a cube is defined by 6 surfaces or planes. Move your mouse pointer over the viewport labelled 'top'. It should look like a plus with a fuzzy rectangle. Now click and drag on the grid in the top viewport to draw a rectangle. When you let go of the drag, the rectangle should turn white and 8 little white handles should appear around it. You can use the handles to resize your rectangle.
KEY POINT: Look at the other viewpoints. Your rectangle is actually a 3d box! Isn't that rad? What you need to get used to is looking at a 3d object from different 2d views. If you can master that, you'll be able to create just about anything you like!
Now notice that you can resize your box in all 3 viewports. This may not seem important now, but when you are building a complex shape later, this is super-duper useful. Also try clicking inside your box and dragging it. This is how you move it around.
Now hit Enter on your keyboard. Your box should have turned blue or green, meaning it actually exists now. Before it was just a plan. You can click on your box, or brush, like I said earlier, and it will turn red. In Hammer, when something is red, that means it is selected. You can resize and move selected brushes just like you did before.
Get Ready for the Next Step!!!
Step 4 - Learn to Fly
See that big juicy red button that looks like this?

That's the camera button, and we're going to use it to look at stuff! So click it and enter camera mode. In camera mode you can't move brushes around, you can only look around. So, hold shift and click and drag in the top viewport from A to B as shown:
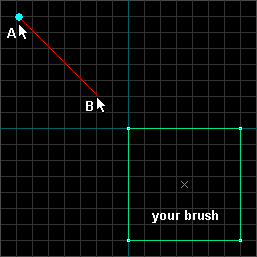
That's how you create a new camera. The blue circle is the eye and the red line is the direction of sight. By clicking on either end you can move them around. To delete a camera, just press Delete on your keyboard while it is selected (red).
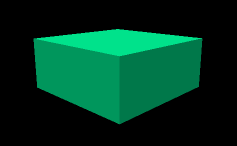
If you created your camera correctly, you should see a 3d box in the upper left viewport like this:
If you don't see it, look in your top, front and side viewports to make sure that the line of sight is pointing from the eye to your brush. If you STILL can't see it, make sure your camera isn't too close to your brush. Don't read further until you can see your brush in 3d!
If you can see your brush in 3d, left click and hold in the 3d viewport and move the mouse around A LITTLE BIT. This is how you turn the camera view, or look around.
Now RIGHT click and hold in the 3d view and move the mouse A LITTLE BIT. This is how you move the camera in it's plane of vision -- any direction but forward. Get used to this and then continue reading.
Ok, now here's where it gets wild, LEFT AND RIGHT click at the SAME TIME and hold in the 3d view and move the mouse. This is how you move forward.
These controls may seem odd but once you get used to them you'll be able to fly around your map with the greatest of ease. The reason why I told you to move the mouse A LITTLE BIT is because if you move too much you can get lost in the scary blackness. If this happens to you, just create a new camera in the top viewport that is pointing at something to look at.
Now that you can fly, let's build a room...
Step 5 - Plumbing
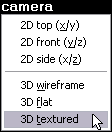
Before I explain what a leak is, why don't you click where it says camera in the 3d view and select 3D textured:
You should now see that your brush is wall-papered with that texture you picked earlier. You can click any of the viewport labels to change what each view is, but don't worry about that now. Back to the main subject, here's the most important point of all this:
Your job as a mapper is to build a 3d container that holds water (or beer).
Stunned? Let me explain. Think of brushes as solid blocks of wood you can glue together and build stuff with in real life. Now whatever you build, we're going to magically fill it with precious, precious beer. Then we're going to turn it upside down and shake it around A LOT. If any of the beer comes out, you have a leak. LEAKS ARE BAD. The biggest problem beginners have is leaks.
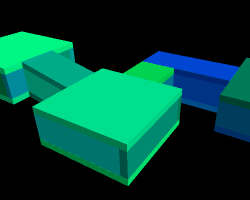
Take a look at this box, maybe it's going to be a room in a Counter-Strike map:
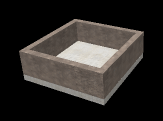
It's got an open top, and that's not good. You know why? The beer! We're going to lose the beer! All we need to do is slide a brush on top to seal up the room:
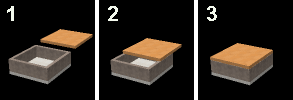
Only in picture 3 is the beer going to be safe. No matter what shape map you make it has to be all sealed up with NO leaks. Example:
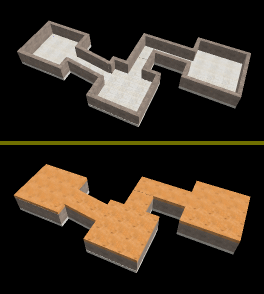
Check it out! This complicated system of rooms and hallways is just a bunch of brushes sitting in the right places. I made it by positioning each one where you see it:
Now I want you to just build a single squarish room. So first, click on this button:

That's the selection tool -- it's what you were using after you created your brush, when you moved it and stretched it. Now click on your brush to select it (in 3d or 2d view). It should turn red. Use the white handles in the 2d views to make it square and flat. It's going to be your floor.
It might be helpful to know that you can use the + and - keys on the FAR RIGHT EDGE of your keyboard to zoom in and out in the 2d views. Just put your mouse pointer over a 2d viewport and press keypad + or -.
Remember how you could move your brush by clicking on it (not the handles) and dragging it around? Try this: hold shift, click on your brush and move it to a different spot, then let go. You have to be holding shift when you let go on the mouse. If you do it right, you will have made a copy of your brush. Take this copy, and using the white handles, resize and move it to make a wall like this:
Once you have done that, keep copying the wall to make the 3 other walls. Then copy the floor, and make a ceiling out of it. Be careful that you don't just move the originals! You need to COPY them -- it's easy to mess up.
When you're done, you should have something similar to the closed beer-box above. Try to move your camera into your room and look around. Then get ready for Step 6!
Step 6 - Sprinkles
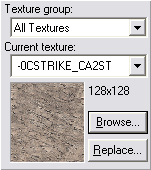
Before we sprinkle some entities onto your map, let me show you one more thing about textures. Click the Browse button in the upper right by the little picture of the texture you picked earlier. Select a different looking texture. Then (in selection mode, not camera mode), click on your floor brush. Once it's turned red, click this button:

As you hopefully noticed, this button applies the current texture to the selected brush(es). By the way, you can select more than one brush by holding Ctrl while clicking on brushes. Also, if you click in a 2d view, but not on a brush, and drag, you can make a selection box. When you hit enter, any brushes inside the box will turn red (selected). You should try this out a bit.
Back to business: we need to create a start point or two. Preferably one for CT and one for T. This is going to be pretty easy so just click the ugly light bulb of justice:

This is the entity creation tool. Now, if you look to the right, you should see a panel like this:
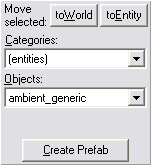
In the listbox titled Objects, or where it says 'ambient_generic' in the picture, choose 'info_player_start'. info_player_start is the CT start point entity. An entity is an object you can place in your map that has some special meaning to the game. Wherever you place info_player_start's is where each CT will start at the beginning of a round of Counter-Strike.
Now move your mouse pointer over the top 2d viewport. Your pointer should look like a creepy plus with an axe. Click inside your room and this will make a little green square with lines sticking out of it -- a locator. Make sure the locator is inside your room in ALL THREE 2D VIEWS. Then hit Enter on your keyboard. Now you should have a tall green box -- about the size of a Counter-Terrorist. As long as it is completely inside the room, you are ok. You can move it around with the selection tool (red arrow). Make sure it is not touching the floor or walls or ceiling because then the player will be stuck! It's ok if it's floating in the air. It's not ok if it's outside the room in invalid space because that is another way to get a LEAK error.
Now create another entity, but this time make an info_player_deathmatch. This is the Terrorist start point entity. In a real map you'd want 16 or so of each kind, but for this map 1 each is ok.
Now for the last addition to your map: a light source. It's another entity so choose 'light' from the Objects listbox. Put this inside your room as well, maybe near the ceiling. A light entity is just an invisible dot that radiates a little sunshine. You won't see a light fixture or anything inside the game -- you'd have to build that out of brushes.
Your light should look like a little pink box, and you know what we do to little pink boxes, right? We click on them! And they turn red! Once you have done this, press Alt-Enter. Alt-Enter is keyboard speak for "show me the properties!" This works all over the place, not just Hammer. Try clicking on a file in windows and pressing Alt-Enter.
Anyway, you should see this now:
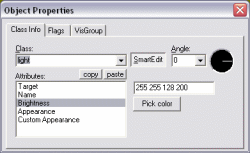
Notice the list of attributes. All entities have some attributes and some entities have lots. Click on Brightness. The value should be 255 255 128 200. The first three numbers are the color (yellow in this case) and the fourth number is the brightness. Leave the brightness alone but use the Pick color button to pick some god-awful color for your light to shine. When your're done, close the Object Properties window and save your map with File->Save.
I don't care where you save your map but don't close Hammer, just minimize it. (Don't use spaces in your map name.) Then continue:
Step 7 - Finish Line
In Step 1 I told you to download the ZHLT Windows executables. That file should be a ZIP file so go ahead and extract all the files in it to a new folder on your hard drive. A good place for this is:
c:\zhlt\
Open that folder so you are looking at the contents:
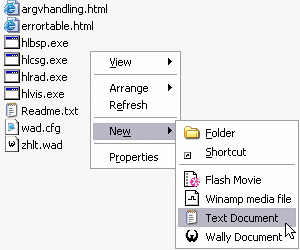
If you do not see file extensions on your files, like the '.exe', '.txt' above, then click here it's very important!
As shown in the picture, create a new text document by right clicking in the white-space and then using the pop-up menu. Name the file 'mapname.bat' where mapname is what you decided to call your map.
Go back into Hammer and click File->Export to .MAP. Save you map as 'mapname.map' in the folder where you just created 'mapname.bat'. Then close Hammer and go back to the folder where 'mapname.bat' is.
Now right click on 'mapname.bat' and choose Edit. This should cause Notepad to open with nothing in it. Type the following stuff into the document exactly as shown, replacing 'mapname' with whatever name you are actually using:
[SIZE="6"]Without Steam[/SIZE]
@echo off
hlcsg mapname
hlbsp mapname
hlvis mapname
hlrad mapname
copy mapname.bsp "C:\half-life\cstrike\maps"
cd C:\half-life
pause
hl -dev -console -game cstrike +sv_cheats 1 +map mapname
"C:\half-life" may not be the correct location of Half-Life on your computer. Make sure you type the correct location on both the lines where it says that. [/B]
[SIZE="6"]With Steam[/SIZE]
@echo off
hlcsg mapname
hlbsp mapname
hlvis mapname
hlrad mapname
copy mapname.bsp "C:\Steam\SteamApps\EMAIL\counter-strike\cstrike\maps"
pause
"C:\Steam\Steam.exe" -applaunch 10 -dev +sv_cheats 1 +map mapname
[B]"C:\Stea