The Pinkus Effect
This tutorial is dedicated to many techniques I used for animating. It details how I animated and some tricks I used to animate. I may or may not deck this tutorial with EVERYTHING I know and do, but it will detail the major things that I do. This is also to help all those who've PM'd me over the years since I started about how I did some things. Also, this tutorial assumes you know how to Flash at least a little bit and that you already know your way around the toolbars and buttons.
Part A) The Weapon Concept
Part B) Backgrounds to die upon
Part C) Character styles (Under Construction)
Part D) A myriad of tricks (Under Construction)
Part E) Other (Under Construction)
The Pinkus Effect
Started by: Mr. Pinkus | Replies: 33 | Views: 8,602
Jul 11, 2008 1:21 AM #183173
Jul 11, 2008 1:21 AM #183175
Part A) The Weapon Concept
For me, a good looking weapon with details yet still containing that cartoony effect is important. If your characters are extremely real looking, having crappy looking weapons or weapons that are just solid color filled ruin the atmosphere of the animation. The reverse is also true, where if you have some regular old black sticks running around with overly detailed weapons, things just look weird. The below walkthrough is what I go through everytime I create a weapon.
Concept 1) The outline
Before you start adding in details and the like, your gonna need a base for the weapon your created. First start by creating a very rough sketch of a weapon your gonna make, whether its only the outline or you include internal lines. Then, fine tune this sketch and form the final shape of the weapon. The final shape for this demonstrative weapon is pictured below.

Concept 2) Basic color
So you have an outline, now what? Well, now you need to start coloring it in. Just go for basic colors for right now, just so you have an idea of how the layout of the weapon's color scheme is gonna be like. For me, I like to just use grays or slight variants of gray, and make the little parts of the weapon that are on the outside have a lighter color than those on the inside. Picture below is the basic color of this weapon.

Concept 3) Shades
This next step isn't very hard at all, and yet the end result is a lot more better than if you didn't do it. Grab the line tool and choose a color that's not on the weapon (For instance, my weapon is only made out of black lines, so anything but black would suffice). I also like to use a bright color or a color completely opposite of the general populous of lines, like green for example. Pictured below, the first is what the whole weapon looks like with these green lines running through, and the second is a close up of what the lines are for. You make the line, then color one side a different color.


Concept 4) Eraser
Since you used a different color line to show where to shade, it will be easy to get rid of said lines. Just double click a green line, and all connecting green lines will be selected. Now just delete it, and you just passed this step with ease. Make sure there's no gaps where you colored.

Concept 5) Finale
Next, you add in the details. You can add whatever it is you want, just remember to keep the minimal style (unless you're going for overly detailed). I used a few little lines that resemble scratch marks for mine, and used the Shades concept to add in a few more different colors. The finished result is below.

Using this method, you can get a handful of weapons both quickly and efficiently.


For me, a good looking weapon with details yet still containing that cartoony effect is important. If your characters are extremely real looking, having crappy looking weapons or weapons that are just solid color filled ruin the atmosphere of the animation. The reverse is also true, where if you have some regular old black sticks running around with overly detailed weapons, things just look weird. The below walkthrough is what I go through everytime I create a weapon.
Concept 1) The outline
Before you start adding in details and the like, your gonna need a base for the weapon your created. First start by creating a very rough sketch of a weapon your gonna make, whether its only the outline or you include internal lines. Then, fine tune this sketch and form the final shape of the weapon. The final shape for this demonstrative weapon is pictured below.
Concept 2) Basic color
So you have an outline, now what? Well, now you need to start coloring it in. Just go for basic colors for right now, just so you have an idea of how the layout of the weapon's color scheme is gonna be like. For me, I like to just use grays or slight variants of gray, and make the little parts of the weapon that are on the outside have a lighter color than those on the inside. Picture below is the basic color of this weapon.
Concept 3) Shades
This next step isn't very hard at all, and yet the end result is a lot more better than if you didn't do it. Grab the line tool and choose a color that's not on the weapon (For instance, my weapon is only made out of black lines, so anything but black would suffice). I also like to use a bright color or a color completely opposite of the general populous of lines, like green for example. Pictured below, the first is what the whole weapon looks like with these green lines running through, and the second is a close up of what the lines are for. You make the line, then color one side a different color.
Concept 4) Eraser
Since you used a different color line to show where to shade, it will be easy to get rid of said lines. Just double click a green line, and all connecting green lines will be selected. Now just delete it, and you just passed this step with ease. Make sure there's no gaps where you colored.
Concept 5) Finale
Next, you add in the details. You can add whatever it is you want, just remember to keep the minimal style (unless you're going for overly detailed). I used a few little lines that resemble scratch marks for mine, and used the Shades concept to add in a few more different colors. The finished result is below.
Using this method, you can get a handful of weapons both quickly and efficiently.
Jul 11, 2008 1:22 AM #183178
Part B) Backgrounds to die upon
(Please note this is just a copy and paste of my other thread)
First, start out with a basic outline of what your drawing. For me, I use black as the basic background, light blue as the far away scene, and green as the foreground, or close objects, all in different layers so it's easier to edit.
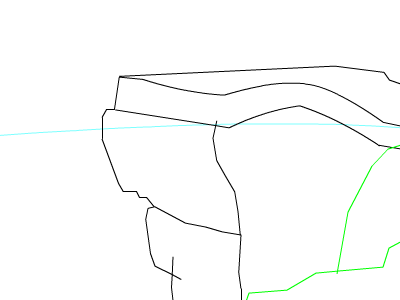
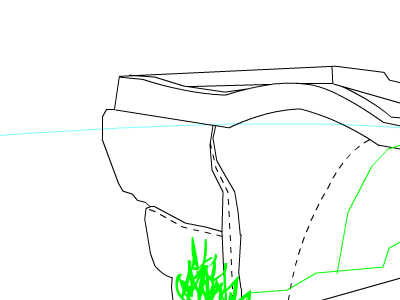
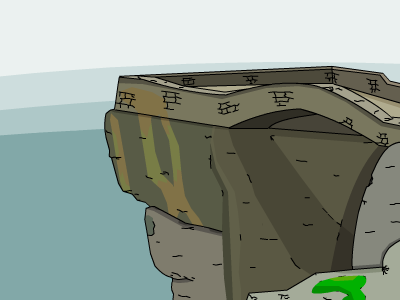
Second, once you decide a good outline of what you want, start making it more detailed. Delete the overlapping lines. If your wanting to have shadows, then make those shadow lines afterwards (for this BG, the shadows are represented by dashed lines). Don't get too detailed just yet, because coloring is essential and more important than little details.
Third, is a little coloring. Always figure out what color scheme will work, because colors that blend into eachother and match are better than seeing a tye-dye background. In the two pics, I started out with the basic coloring of the far away scenery, then move up to the rest.
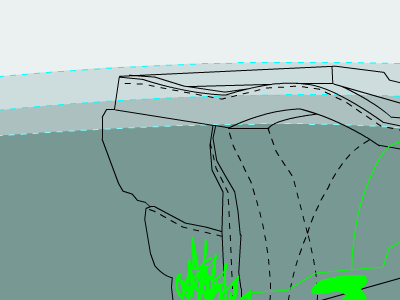
As you can see, it's already looking great. The color scheme just looks perfect!
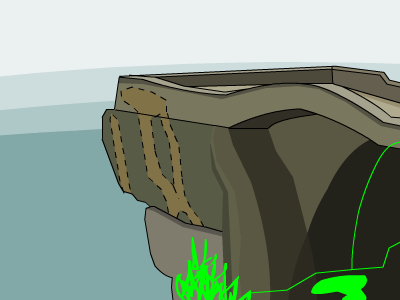
For the Coup de Grace, details. Add as many or as little you want. Don't make it overbearing or too distracting. Too many details just looks overdone and bad. Also, it's a good time to delete things you may not have wanted. For instance, the plant in the foreground has been erased, as I felt it was too much of a distraction and got in the way of what was behind it.
Ofcourse, there is still much to do. For instance, the very far background is just a gradiant. Ugly. But, I leave this is up to you, dear reader, to be on your way and make your own backgrounds. Now get the **** out of my thread.
(Please note this is just a copy and paste of my other thread)
First, start out with a basic outline of what your drawing. For me, I use black as the basic background, light blue as the far away scene, and green as the foreground, or close objects, all in different layers so it's easier to edit.
Second, once you decide a good outline of what you want, start making it more detailed. Delete the overlapping lines. If your wanting to have shadows, then make those shadow lines afterwards (for this BG, the shadows are represented by dashed lines). Don't get too detailed just yet, because coloring is essential and more important than little details.
Third, is a little coloring. Always figure out what color scheme will work, because colors that blend into eachother and match are better than seeing a tye-dye background. In the two pics, I started out with the basic coloring of the far away scenery, then move up to the rest.
As you can see, it's already looking great. The color scheme just looks perfect!
For the Coup de Grace, details. Add as many or as little you want. Don't make it overbearing or too distracting. Too many details just looks overdone and bad. Also, it's a good time to delete things you may not have wanted. For instance, the plant in the foreground has been erased, as I felt it was too much of a distraction and got in the way of what was behind it.
Ofcourse, there is still much to do. For instance, the very far background is just a gradiant. Ugly. But, I leave this is up to you, dear reader, to be on your way and make your own backgrounds. Now get the **** out of my thread.
Jul 11, 2008 1:23 AM #183179
Under Construct
Jul 11, 2008 1:24 AM #183180
Under Construction lawl
Jul 11, 2008 1:26 AM #183181
Coming Soon.......
Jul 11, 2008 9:16 AM #183544
I know that background tutorial... Thanks for the weapon stuff though.
Jul 15, 2008 3:03 PM #188044
lol B) says "Wepons to Die For" where its Backrounds to die for just so u know
Jul 15, 2008 11:49 PM #188602
Yeah,
Well this needs to be completed soon.
I need the character design tutorial
Well this needs to be completed soon.
I need the character design tutorial
Jul 18, 2008 12:42 AM #191192
Doing another chapter possibly tomorrow
And fixed some errors
And fixed some errors
brunoob
Posts: 0
Joined: Jun 2026
Posts: 0
Joined: Jun 2026
Jul 18, 2008 1:27 PM #191681
wow, very good tutorial, i loved my new weapon!!
Jul 19, 2008 12:53 AM #192147
Currently working on the character part
May take a while, and may have to make it a two-parter
May take a while, and may have to make it a two-parter
brunoob
Posts: 0
Joined: Jun 2026
Posts: 0
Joined: Jun 2026
Jul 25, 2008 3:59 PM #197820
abandoned topic?? post more tutorials plz!
Aug 1, 2008 12:44 AM #203721
lol bandwidth exceeded.
Aug 1, 2008 2:26 AM #203816
it wont let me view the photobucket pictures