(sorry about the layout)
Passing note: I made this at darkdemon.org and decided to not let it go to waste. It's 100% written by me based on my own knowledge. I had to remove some image tags for the 20 limit, and it may look somewhat un neat because of the difference between font sizes.
Contents
Chapter One: Beginner
1a Basic Flash Interface Guide
-Layers and frames
-Workspace
-Properties/filters
-Symbols
1b Basic FBF tutorial using onion skin
-Part 1
-Part 2
1c Sound/music
-Soundfx sites
-Adding sound effects
-Editing sound
1d Blurring
1e Beginners Action Script
-Play button
-Drag and drop
-Hyperlinks
1f Tweening
-Motion tweening
-Easing
-Rotating
-Shape tweening
1g Final
Chapter two: Intermediate
-Spites
1a)Basic Flash interface guide.
Layers:
If you have had flash for awhile now, not much of this will be new for you. If so please skip this section to avoid boredom.
Before you do anything in flash you should know what you're looking at.
This is the Timeline. It's where all the frames and layers are located.
~Timeline~
Let's dissect it:

These are the layers. When you open a new flash document you will have only 1 layer. To insert more simply right click and insert a new layer.
Pretend layers are transparent sheets of paper. They allow you to arrange where things are in your flash. For example the bottom layer will always be the background.
http://img297.imageshack.us/img297/8435/layerfunctionsal5.png
Click the eyes for the appropriate layer to make whats on them invisible.
The lock locks the layer and makes it impossible to move.
The box makes what ever is on the layer an outline.
These things down effect the movie. They only make it easier to see what it is you are doing.

These are the frames. To insert frames rightclick and 'insert frames'
Keyframes
 are different on the other hand. A keyframe is needed if you actually want to change something. Normal frames just make the keyframe last longer in the animation.
The rest:

Workspace:
~Workspace~
The white square is what people will see. To change the canvas side use the properties bar.
Properties/filter bar:
http://img176.imageshack.us/img176/892/propetiesxf2.png
When making an animation keep the frame rate between 18-24. Anything less will look like crap.
To use the filter bar, first click on a symbol (button movieclip or graphic) and pick a blur or a drop shadow, etc.
Also if you click a symbol you can change its tint, transparency, and brightness, through the properties bar.
Symbols:
Symbols are used to create motion tweens among other things. To create a symbol select something from the work space you wish to be a symbol and press F8.
Movie clip: This is the most use symbol. Anything that you animate inside a movie clip will play in the movie too. You could say, animate someone walking inside a movie clip and then from the main workspace tween the MC across the page to make it look like hes walking across the page.
Button: Use this to create a button which you can add a code to, to make a play button etc.
Graphic: Theses don't get used much. Nearly everything a graphic does a Movie clip will do.
1b) Basic FBF tutorial using onion skin:
Part 1:
In this tutorial I'll show you some easy tips to make animating in FBF easier. It will be focusing on the brushtool, as opposed to the linetool or sprites.
I'll be using THIS FLASH as an example.
Here's what I had to do for the first transformation: Face to banana.

The I did the same thing inbetween 1/2banana and banana, and 1/2 banana and face.
Get it?
You can use this technique for more things then just morphing. Many people use it for full body animations as well.
Part 2:
To make something like THIS FLASH you can use the onion skin too.

And thus concludes the onion skin section of this tutorial.
1c) Sound/music
Soundfx sites:
www.findsounds.com/
www.flashkit.com/
http://freesoundfiles.tintagel.net/
http://www.soundhunter.com/
http://amazingsounds.iespana.es/en/
Adding sound effects:
If you want to add sound effects to your flash the first thing you must do is make a new layer for the sound/music.
The next step is to go file> import> import to library.
Once you have imported the desired music, insert a keyframe where you want the sound to start, in the new layer.
Click on this keyframe and look at your properties bar.


Hit the drop-down menu and pick the song. If you don't see the jaggedy lines that means you don't have it set to stream, which is what I personally use because it's easier to test with and you can sync with it.
Editing sound:
The only true way to edit sound for flash is with another program, but what the kind people at macromedia have made is a way to fade away/in the music.
To change this, once the frame has a song on it, click that frame and press edit in the properties bar.
You should see something like this:
http://img296.imageshack.us/img296/8629/editfh3.png
The top bar is for your left speaker and the bottom is for your right. From here you can control the balance of each. You can either use a setting from the drop down menu you custom fade it to your liking. To do so just click on the black line with the square on it and a new box will appear. By dragging it you can easily see how it works.
1d) Blurring
Blurring is actually surprisingly simple. I'll be using THIS FLASH as a guide.
To start you have to draw thing you want blurred. This is probably the hardest part. Next to be able to actually blur it you have to make it a movie clip.
So you say to yourself, But I've seen brush FBF animations that don't have any movie clips in it with blurring. Wrong, They did have movie clips. They just made the stick man on one of the frames into a movie clip.
After you have the thing drawn or animated, (if you are just touching up an old animation) the rest is quite simple. Just click the movie clip and go to the filters bar.

The same thing can be done to make something glow, drop shadow, ect.
1e) Beginners Action Script
Action script or AS is the coding language for flash games/buttons. In this section we'll get into some basic action scripts that you'll probably use even if you're not making a game.
Play button:
Timeline control is probably the most used set of tools for anyone. To begin any movie
people like to put a play button, so it doesn't start without you. To start lets make a play button.
http://img120.imageshack.us/img120/9043/playub7.png
So far it looks like THIS
Now we just need to add some code to it. Before you do anything, go out of the playbutton and insert a new layer.
In the first frame of the new layer right click the keyframe and select 'actions'

The actions tool bar will pop open. When it's open make sure you're in 'script assist' and then click the + sign to add a code. For this we need to add a stop code so the movie doesn't start playing at the beginning. So after you press the + go to global functions > timeline control > stop

After you pick stop it should look like this.

Now close the actions window and right-click the green button. After you right-click pick actions.
The actions window should pop up again. This time when you press the + go to global functions > timeline control > play. Now leave this and animate the rest. It should look like this when you're done.
http://www.swfup.com/swf-view.php?id=2828
The only thing you have left to add is the replay button. Make a button like before and and a keyframe with the code stop in it.
Right click the button and go to actions like before, except instead of going to play, go to 'goto'
http://img207.imageshack.us/img207/7379/replayyj1.png
Change the frame to 2 so it doesn't go back to the play button.
You're done!
Drag and drop:
To make a drag-able object is easy if you know the code.
First make what you want to drag a button. Then add these actions too it.
on (press) {
startDrag (this, true);
}
on (release) {
stopDrag ();
Now make sure you're in the main workspace and click the button. Press F8 turn it into a movie clip. If you don't do that then when you try to drag the button when you test it, you will instead drag the whole screen.
Hyperlinks:
To make a link inside of a flash is easy. Make a button off some text or a picture to be your link first off. Now right click that button do the following:
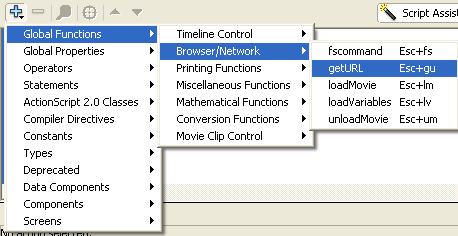
Now put your site name into the url box.
http://i46.photobucket.com/albums/f126/hamandcheeseclock/url2.png
Done :D
1f) Tweening
Motion tweening:
What is a tween? A tween is what you use to fill in the movements of a symbol.
For example. Draw anything into your workspace, and then make it a movie clip. Insert a keyframe about 20 frames away and in that keyframe move the movie clip somewhere else, but don't draw on the workspace.
Now right click the frames inbetween the 2 keyframes and 'create motion tween'
Test your movie :D It should look something like this.
http://www.swfup.com/swf-view.php?id=2834
Easing:
Easing is what you do to a tween to make it smoother. Kind of like movement spacing in pivot. To add an ease click the first or last keyframe in the tween. Then look at your properties bar. You should see this.

Adjust the number to either +100 which is from fast to slow, or -100 which is from slow to fast.
Play around with easing, because with easing you can make the physics look more real, like a ball bouncing.
Rotating
If you haven't noticed yet when you go to add an ease right below it is the rotate option. To make an object spin around, simply change the drop down menu to clock wise or counter clock wise and add the number of times you want it to spin.
Shape tweening:
Shape tweening is a motion tween for a fill. (A fill is the stuff the brush leaves behind)
It allows you to morph drawings. The sad part about shape tweens is that people nearly always use it poorly. Here's an example of a bad one.
http://www.swfup.com/swf-view.php?id=2836
The drawings that morph shouldn't be too different. Shape tweening is mostly used for touching fbf up. They work pretty much the same as a motion tween, only they can't work with symbols and to add them you have to use the properties bar.

1g) Final
To finish the beginners chapter I'll make a movie using only the techniques we learned above. This will show you what you are now capable of after reading so far.
After reading about Motion tweens, blurring, button design, sound effects, basic action script and easing you should be completely capable of making something like THIS
FLA.
Intermediate
The stuff below won't explain every vague little detail because I'm assuming you know it.
2a) Sprites:
I personally do not like sprite movies because they don't showcase anything original. As a forewarning I do not suggest making sprite animations because they nearly always turn out lame/unfunny.
What is a sprite animation? They're ripped pictures characters and backgrounds from old games which you sting together to make them moving.
Sprite sites:
Best sprite sites ever:
http://tsgk.captainn.net/?p=subhierarchal&t=sy&t2=ga
http://www.gsarchives.net/index2.php?category=all&system=snes&letter=all
The rest:
http://tsgk.captainn.net/?p=showgame&t=sy&sy=7&ga=242
http://www.videogamesprites.net/
http://www.nes-snes-sprites.com/
http://kiki.angry-gamers.com/sprites.php
If you can't find what you're looking for Google is always and option.
Getting them into flash
The easiest way to get the image into flash is to copy and paste it, but if it has a transparent BG you'll have to import it
FIle>Import>Import to stage> Wherever you saved it.
. How do you cut them out?! The answer is easy. First click on the image. Then trace the bitmap. Modify > Bitmap > Trace bitmap.

Set the settings to the following. This will cut it out exactly as you see it.

Animating:
To animate a sprite movie most people make movie-clips with commonly used loops (Running, jumping, shooting etc.)
To do this pick one of the sprites thats running.
 and make it a movie clip. Call it running. Copy the rest of the sprites needed to animate the running sequence,
http://img177.imageshack.us/img177/6138/runba3.png
and paste them into the movie clip.
http://img96.imageshack.us/img96/241/copymclj4.png
Now make a frame for each sprite and position them so they go in the correct order. Use the onion skin to help you. Make sure that after you position each sprite you delete the left overs (but not before you finish the movie clip). You then should insert frames between each key-frame so it doesn't go blazing fast. You may also have