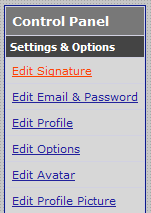
Stick Page Forums Archive

The User CP Guide [Forum]

Started by: Paperclip | Replies: 50 | Views: 51,530 | Sticky

Paperclip

Posts: 840
Joined: Nov 2004
Rep: 500

View Profile
Sep 16, 2006 9:33 PM #15479
The User CP Guide
Table of Contents:
1. Settings & Options
2. Private Messages
3. Subscribed Threads
4. Miscellaneous


Welcome new members of the Stickpage Community! If you have never been to a forum before or with one without a personal profile then this guide is for you. The guide is designed to explain all parts of the User CP. This tutorial is very long so I have decided to divide it into segments so that you can locate the topics you want to read without scrolling through everything. If you have any questions about the User CP after reading this or just have a question regarding the guide itself, feel free to ask it here. I hope this guide will be of use to you and I hope you will enjoy your stay here.

This guide took a long time to make and a seriously long time to take all the screenshots and to crop, cut, and upload the images. Please keep all information and images that are in this thread, in THIS thread. If you want to refer to something out of this guide please just link to the post or the whole guide. Thanks -
Paperclip

Posts: 840
Joined: Nov 2004
Rep: 500

View Profile
Sep 17, 2006 6:18 PM #15539
1.Settings & Options:
Signature
Understanding Tools
Adding Images / Animations
Email & Password
Changing your Details
Profile
Optional Information
Additional Information
Options
Login & Privacy
Messaging and Notification
Thread Display Options
Date & Time Options
Miscellaneous Options
Avatar
Adding an Avatar
Profile Picture
Adding a Profile Picture


Paperclip

Posts: 840
Joined: Nov 2004
Rep: 500

View Profile
Sep 17, 2006 6:31 PM #15540
Signature
Understanding Tools:


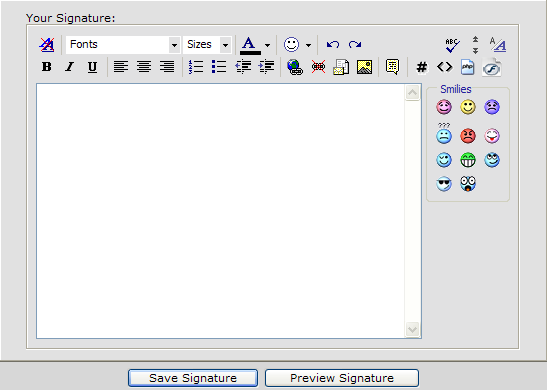
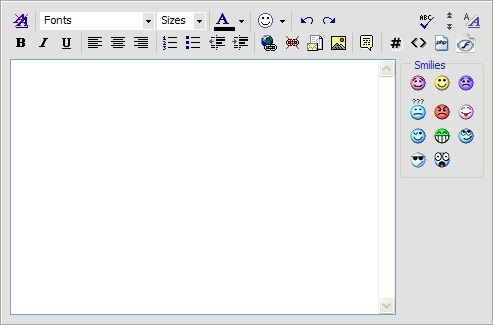
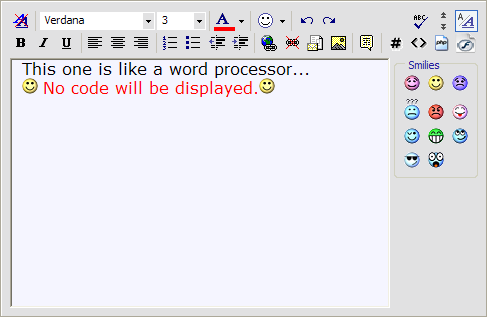
Okay, so these are all the tools / options that you will encounter on the standard text box editor. I've gone through and described what they do and have shown many examples of them as well. If you have never seen a word processor before these will probably be all new to you, but hopefully not. If you don't need to read this you can obviously skip it and keep going on with the guide.

Image

(B) Bold tool is used to bold text. Use it by highlighting the text you want to bold and then clicking the icon.

(I) Italics tool is used to litalize text.Use it by highlighting the text you want to italize and then clicking the icon.

(U) Underline tool is to underline text. Use it by highlighting the text you want to underline and then clicking the icon.

Image

The Numbering tool is used to put items in a list. To use this highlight the portions of text you wish to add to a number list and click this icon.

Example:

  1. Blah
  2. Blah
  3. Blah
The Bulleting tool is used like the numbering tool except that it makes bullets instead of numbers.

Example:

  • Blah
  • Blah
  • Blah
The Decrease Indent tool is used to reset an indented text portion back to normal. To use this just click the icon and it will undo the text that was indented.


Example:
This is indented!


This is not!

Image

The Alignments tools are used to place text in differnent places in the text editor. Left Alignment would be on the left of the editor. Centered Alignment would be in the center and right alignment would be on the right. To use these tool you must highlight the portion of text you want to align and then click one of these icons.

Examples:

Left Alignment

Centered Alignment

Right Alignment


Image

The Insert Link tool is used to make text links a hyperlink. To do this copy and paste your link into the pop up window that appears when you click this icon. Hit okay, and your link will be clickable.

The Remove link tool is used to remove hyperlinks and make the link plain text. To do this, highlight the link and click this icon.

The Insert Email Link tool is used to make a link an email address. To do this click on the icon and follow the instructions. I've never found any use for this before.

The Insert Image tool is used to add IMG tags to links where no code is given. To use this tool highlight your link to the image and then click this icon. It will add the IMG tags for you.

Image

The Quote Tags are used to "quote" a user's post. To use it select the text you want to put in a quote box and click the icon.

Image

The Code tags are used to put bits of a programming language into. Honestly, it doesn't matter what you put in it but that is what it is designed for. To use it highlight the text you want to put in the code box and click the icon #.

Image

The Remove Text Formatting tool is used to remove all tags from text. To use this select the text in which you want to remove code from. Once you have done that click to icon.

Image

The Fonts and Sizes tabs are used to edit the types and size of the text. To use these options, select the portion of text you wish to change. Once you have done that you can click on the tabs and choose a font and or a size from the drop down menus.

Image

The Color Pallet is used to add color to text. You use this by highlighting your portion of text and clicking the tab. Depending on which editor you are using there will be a drop down menu or a pallet of colors that you can choose from. When you have found the color you want click it and the code will appear around the portion of text.

Image

The Smiley Pallet is used to add smilies to your posts. To use it click on the tab to bring down the drop down window. Choose the smilie you want to use and the code will appear.

Image

The Undo and Redo tools are used just like in any other program. The left arrow undo's any last command and the right arrow redo's any command that was previously undone.

Image

Spell Check option is used for internet explorer. It must be downloaded and therefore is not frequently used. If you see most posts on stickpage you would doubt this tool was used as well. If you wish to download though it works like any other spell check.

The Decrease and Increase size options will increase or decrease the size of the text box. The top arrow is decrease and the bottom arrow is to increase. To do either one, just click the arrows.

Switch Editor Mode allows a user to switch between the Standard Editor mode and the Enhanced Interface mode. The differences between them can be found here.

Table of Contents
[SIZE="3"]Settings & Options[/SIZE]
Paperclip

Posts: 840
Joined: Nov 2004
Rep: 500

View Profile
Sep 17, 2006 7:27 PM #15541
Signatures
Adding Images / Animations


Signatures can come in various ways. They can be text, images, animations, etc… How do you set up your signature? Well, good question! That is the goal I will be trying to help you achieve with this part of the Guide.

Because signatures can be basically anything you want, it is hard to try to tell you how to set up something that is so broad. So, for my sake, I’m just going to go over three different types of signatures and how to do them. Some will be very basic and some will be a little more confusing… maybe. So let’s get started.

1. To set up your signature, you will need to go to your user cp. To do this click the “User CP” button on the navigation bar. You can also skip the next step by going directly to the “Edit Signature” window if you user the link under “Quick Links”.

Example:
Image

2. If you just clicked on the “User CP” button from the navigation bar you will need to click the “Edit Signature” link in the control panel to get to where you can actually edit your signature.

Example:
Image

3. Whether you used the Quick Links or the Navigation Bar the end result is the same; a huge text box that is calling for you to fill it up.

Example:
Image

4. So, what do you want in a signature: images, text, or animation? Well, let’s do all three.

5. The first part of a signature I’m going to cover is, “How to add images/animations” to your signature. To add images to your signature you must use an image hosting site. Two good sites to use are www.imageshack.us and www.photobucket.com. I’ll show you how to upload images to both and how to put the uploaded images from those sites into your signature. Sound good? Well, let’s continue.

Imageshack.us:
Imageshack.us is a site that allows you to upload an array of image files for free. The good thing about imageshack.us is that it gives you the code you will need to use the image in your signature without you having to do it.

1. To upload an image to imageshack.us simply press the browse button and select the image you wish to upload from the new window that pops up and click okay. Once you have selected your image click upload. You will then be sent to a screen that has a lot of different links.

Example:
Image

2. The link you will want to copy is the “hotlink for forums (1)”. Copy that whole link and then paste that in your signature.

3. (Optional) If you want you can delete the [/*URL] part of the code. All that does is make it so that when you click your image it will send you to imageshack.us. I’m sure you don’t want to do this though. You can however change the URL to fit your needs. Say you want to advertise your forum. Just insert your URL where theirs is and then whenever anyone clicks your signature they will be redirected to your forum.

Photobucket:
Similar to imageshack.us, Photobucket is an image hosting service where you have your own account. This means you have to register for one but it is much better in my opinion. Sometimes with imageshack.us they will lose the images and then if you have written a tutorial, well, all the images will be gone. With Photobucket, you control what images you delete and keep.

So, let’s explain how to do what you did with imageshack.us with Photobucket.

1. To upload your image/animation to Photobucket click the browse button and locate the file you want to upload. Click upload and when it has uploaded your image you will see the title, “*Upload Successful*”. This obviously means that your image is uploaded and that now you can proceed to copy the link necessary to display it in your signature.

2. Next, you need to find the newly uploaded image/animation. Copy the code that says IMG next to it. Here is an example if you need it.

Example:
Image

3. Once you have copied the link you can then paste that in signature text box. Oh, and look, you don’t have to delete any URL coding like you do with imageshack.us. Go Photobucket!

Once you have uploaded your images / animations all that is left to do is use the signature tools if you want to center your image / animation or add anything else you would like.

If you want to add a flash animation there is a different method of uploading it onto stickpage. You can see how that is done by following the tutorial [URL="http://www.stickpageportal.com/forums/showthread.php?t=23055"]here
.

Table of Contents
[SIZE="3"]Settings & Options[/SIZE]
Paperclip

Posts: 840
Joined: Nov 2004
Rep: 500

View Profile
Sep 19, 2006 10:42 PM #15600
Email & Password
Changing your Details


Okay, most of this is very self explainitory.

Image

To be able to alter any of the information you have to enter your current password to continue. This allows people that might gain access to your account without knowing your password from altering it.

Image

Once you have entered your current password you can choose to change your password. To change your password you must enter it twice in box text fields. The forum will let you know if the passwords don't match.

Image

With your current password entered, you also have the option to change your email address. To do this enter your new email address in both text fields.

Hit "Save Changes" to save your settings.

Table of Contents
[SIZE="3"]Settings & Options[/SIZE]
Paperclip

Posts: 840
Joined: Nov 2004
Rep: 500

View Profile
Sep 19, 2006 10:45 PM #15601
Profile
Optional Information


Like the title sugests, all this infomation is optional. Most people like to fill it out however. So I'll explain what everything does.

Image

A Custom User Title is a phrase or title that is displayed under your Username. This can be any text based phrase. I've included mine in the screenshot. To set your own type your phrase in the text field and then hit submit changes. If you already have a Custom User Title and want to make a new one you can check the box "Reset" and your title will be deleted.

Image

So, date of birth or your birthday is pretty standard on most forums. This is where you can set it on ours. The instructions are very simple and easy to follow. You enter your month, day, and year of birth. You can change the display order by clicking on the drop down menu and you can clear the fields by selecting clear.

Image

This feature allows members of the forum when they view your profile to see your website. This is an effective way to advertise your forum or website. To use this feature just type your website address into the text field and hit sumbit changes. Your website will then appear in your public profile.

Image

Okay, so now it comes to contact information. This is where you can let people know how to contact you. So, if you have any of the instant messaging programs listed you can type your email address you use so that people can then add you to their friends list or whatever. If you decide to do this it will be publically seen under your profile. If you only want a few people to know about your email address, then you should not list it here.

Table of Contents
[SIZE="3"]Settings & Options[/SIZE]
Paperclip

Posts: 840
Joined: Nov 2004
Rep: 500

View Profile
Sep 19, 2006 10:46 PM #15602
Profile
Additional Information


These last text fields in the Profile are for you to enter any information about yourself. The only fields that are displayed are your location, interests, and hobbies. The location is under your Username and the rest is under your public profile. None of the information has to be correct.

Image

Table of Contents
[SIZE="3"]Settings & Options[/SIZE]
Paperclip

Posts: 840
Joined: Nov 2004
Rep: 500

View Profile
Sep 20, 2006 1:08 AM #15609
Options
Login & Privacy


The image describes exactly what that option will enable if you check the box. Your Username (which everyone knows) and your email (which everyone might not know) will be available to download by anyone. If you want your email to be secret you should not check this box. It is as simple as that.

Image

Table of Contents
[SIZE="3"]Settings & Options[/SIZE]
Paperclip

Posts: 840
Joined: Nov 2004
Rep: 500

View Profile
Sep 20, 2006 1:09 AM #15611
Options
Messaging and Notification


This next set of options deal with the private messages and options for them.

Image

It is recommended that you keep the first options checked because it is the only way administrators can easily keep in contact with you. It is another way you can stay up with news concerning the forum if the admins decide to send out an email to everyone.

The next option means that your email will be visible to everyone on the forum. This means your email will not be private and anyone can send you junk. Who knows, there might even be people who submit your email address to spam site so they can send you junk mail. I would suggest keeping this option turned off.

Image

Subscribing to a thread is a good idea if you are eager to get a responce. Other than that reason given, I would not suggest it. If you subscribe to a thread, every reply will be notified and an email will be sent to your email address saying that a new post has been made. This feature is very annoying and if you forget to stop subscribing and the thread is a very active one, you might be getting a new email account within a week.

Image

These next options are for private messages. Minus the first option, the last new are ways to notify you of a new private message. Regarding the methods of notification, I would suggest not choosing the second method because again it involves sending an email to your email address which in turn can result in a lot of emails. The last method of notification is better than the email. When you log on or load the page a pop up will appear notifying you of a new message. The only bad thing to this is that if you have a pop up blocker then it will block the pop up.

Keep the first setting because that is the only way people can get in touch with you.

Table of Contents
[SIZE="3"]Settings & Options[/SIZE]
Paperclip

Posts: 840
Joined: Nov 2004
Rep: 500

View Profile
Sep 20, 2006 1:09 AM #15612
Options
Thread Display Options


Image

So, these options listed allow you to control what you want to see on the forum. If you don't like seeing a multitude of avatars or signature or even images you can turn all those options off and just see usernames and locations. These options are on by default but can be changed. These options can be useful however if there is a spam attack and someone posts inappropiate images that you don't want to see. Just uncheck the box for images and you won't be able to see them anymore. When the spamming is over then you can turn back on the setting.

Image

Okay, the setting that you have on right now is Linear - Oldest Post first. This means that the first post of the thread is the first post your see. The next option is just the opposite. The oldest post is last and the newest post is shown first.

The last two options are the same. These last two options put a scroll box at the top of the thread that contains links to all the posts that were made in that thread. This can be helpful or not.

Example:
Image

Image

This option is very simple. It allows you to set how many posts you want per page. The forum defualt is 10. You can change this number to anything you would like. If you change it though, it will just make scrolling down longer.

Image

This feature allows you to set the time limit that you want threads to be shown. You can set it so that after 2 days of inactivity a thread will not be shown anymore unless you search for it. This feature can be good or bad. For my purposes I just leave this setting on forum default.

Table of Contents
[SIZE="3"]Settings & Options[/SIZE]
Paperclip

Posts: 840
Joined: Nov 2004
Rep: 500

View Profile
Sep 20, 2006 1:10 AM #15613
Options
Date & Time Options


Image

This is where you go to edit your timezone settings so time will display the way it does on your computer. So, to do this click on the tab to bring down all the different timezones. Choose the one that is closest to you. For the US, Eastern Standard Time is -5 and everything else is down a notch I think. I can't help anyone that is outside the US. If you are having problem with this ask someone that is from your country for help. There are a great deal of European members here.

Image

This really isn't that important because I can't see where or how this effects the forum other than the calendar which is disabled to be posted on. But, if you feel the need you may fill out the day which your week starts on.

Table of Contents
[SIZE="3"]Settings & Options[/SIZE]
Paperclip

Posts: 840
Joined: Nov 2004
Rep: 500

View Profile
Sep 20, 2006 1:10 AM #15614
Options
Miscellaneous Options


Image

With the Message Editor Interface options, you can control how advanced your editing tools are when you want to post, reply, edit a signature, etc... There are three different settings you can choose from. I'll describe each one and their uses as well as pointing out what they lack.

Image

The Basic Editor - a simple tool box is exactly what the image above shows, a simple text box. There are no tools, no helps to edit and put code tags around. This to me is not good for anyone who doesn't know the vb code and doesn't know how to set up any tags without the tools. If you want to use this make sure you don't want to have to change any text unless you know all the codes.

Image

The Standard Editor - Extra formatting controls is a better editor and is standard with all members unless they change it. It has all the tools you will ever need and is perfect for users who can't type the vb code without guides. This editor setting is recommended for medium connection computers.

Image

The Enhanced Interface is most like a word processor. All tools are displayed how they would be in a post. Images are displayed and all text, smilies, url's, quotes, code, etc... are shown in post form. This is very useful in writing tutorials ^^. It does require a faster connection because it has to load everything you do. The more images you have the longer the wait. This is recommended to anyone who wants their editor to be like a word processor.

Table of Contents
[SIZE="3"]Settings & Options[/SIZE]
Paperclip

Posts: 840
Joined: Nov 2004
Rep: 500

View Profile
Sep 20, 2006 1:10 AM #15615
Avatar
Adding an Avatar


Okay, for the new members here that have never used or been to a forum that has a user profile with the option to upload avatars, this tutorial is for you. This tutorial is designed to show you how to upload your avatar directly from your computer or from an offsite link.

For the purposes of this tutorial, we will be learning how to upload my avatar.

So, let’s begin…

1. The user profile is a power tool where you are allowed to edit a lot of your account to make it more like yourself, or suit your type of personality. To access your profile, you can click on the User CP button located on the Navigation bar.

Example:
Image

2. This button will take your to your profile. Now, on first look this may be a little overwhelming. There are a lot of links. Well, the link that we are interested in for right now is the “Edit Avatar” link. Proceed to click the link.

Example:
Image

3. Now you will be taken to another page inside your profile. This is where you will edit / upload an avatar. Now, there are two methods of uploading avatars. One involves directly uploading it from your computer and the other involves linking the image you want off another site. Both, methods are easy to learn how to do. So, let’s start with the first: Uploading an avatar from your computer.

Example:
Image

For our purposes, we will be using the bottom half of the above options to upload an avatar from our computer.

4. Okay, so now that you now what we will be doing, let’s start doing it! So, to start, click the Browse button located at the bottom. This will bring up a window that allows you to search your computer to find the file you wish to upload.

Example:
Image

5. Once you find the file you are looking for, select it and hit open. This action will then close that window and leave you will a path in the text box next to browse. Here is an example of what the path should look like when you hit open.

Example:
Image

6. Once you have done all that, all that is left to do is to hit the “Save Changes” button.

7. Now let’s discuss the other method of uploading an avatar is to enter a link to the image you want. To do this you can upload your own picture to an image hosting site, imageshack.us or photobucket.com, copy the direct link and paste it into the top box. Here is an example.

Example:
Image

8. The other way to achieve the same goal without having to host your own image is to find an image you want with the exact dimensions allowed, and use that address to host to.

9. Select “Save Changes” and you are done with uploading your avatar.

Errors?
If you have tried to upload an image and you get an error it could be that you have the wrong deminsions, the size is to big, or you could have been trying to upload an animated gif.

Animated gifs are not allowed for avatars. The members who currently have animated avatars are either moderators, honerable members or they had animated avatars when the forum was transfered over. Unless you become a moderator or an honerable member you will not have an animated gif.

Table of Contents
Settings & Options
Paperclip

Posts: 840
Joined: Nov 2004
Rep: 500

View Profile
Sep 20, 2006 10:36 AM #15632
Profile Picture
Adding a Profile Picture


So, adding a profile picture is the same as adding an avatar. You will see that the steps are almost exactly the same.

Profile Pictures are pictures that are shown when someone views your public profile. You profile picture can be anything that fits the demensions. So, I'm just going to show you how to upload the same avatar again because it fits the demensions and I don't have to take more screenshots. ^^

1. Proceed to your user cp by using the navigation bar and clicking the User CP link.

Example:
Image

2. This button will take your to your profile. Click the “Edit Profile Picture” link.

Example:
Image

3. Now you will be taken to another page inside your profile. This is where you will edit / upload your profile picture. Now, there are two methods of uploading profile pictures. One involves directly uploading it from your computer and the other involves linking the image you want off another site. Both, methods are easy to learn how to do. So, let’s start with the first: Uploading a profile picture from your computer.

Image

4. Okay, so now that you now what we will be doing, let’s start doing it! So, to start, click the Browse button located at the bottom. This will bring up a window that allows you to search your computer to find the file you wish to upload.

Example:
Image

5. Once you find the file you are looking for, select it and hit open. This action will then close that window and leave you will a path in the text box next to browse. Here is an example of what the path should look like when you hit open.

Example:
Image

6. Once you have done all that, all that is left to do is to hit the “Save Changes” button.

Now let’s discuss the other method of uploading an avatar is to enter a link to the image you want. To do this you can upload your own picture to an image hosting site, imageshack.us or photobucket.com, copy the direct link and paste it into the top box. Here is an example.

Example:
Image

8. The other way to achieve the same goal without having to host your own image is to find an image you want with the exact dimensions allowed, and use that address to host to.

9. Select “Save Changes” and you are done with uploading your profile picture.

Table of Contents
[SIZE="3"]Settings & Options[/SIZE]
Paperclip

Posts: 840
Joined: Nov 2004
Rep: 500

View Profile
Sep 20, 2006 9:37 PM #15666
2.Private Messages:
Private Messaging
Understanding features
Composing Messages
Tracking Messages
Creating / Editing Folders


Website Version: 1.0.4
© 2025 Max Games. All rights reserved.